- Logging In
- Posting to the List
- Common List Settings
- Adding Subscribers (Members)
- Removing Subscribers (Members)
- View and Add/Delete List Admins
- View and Add/Delete List Moderators
- Exporting Member Roster
- Configure Message Moderation
- Configure Subscription Moderation
- Moderating Held Messages
- Moderating Subscription Requests
Logging In
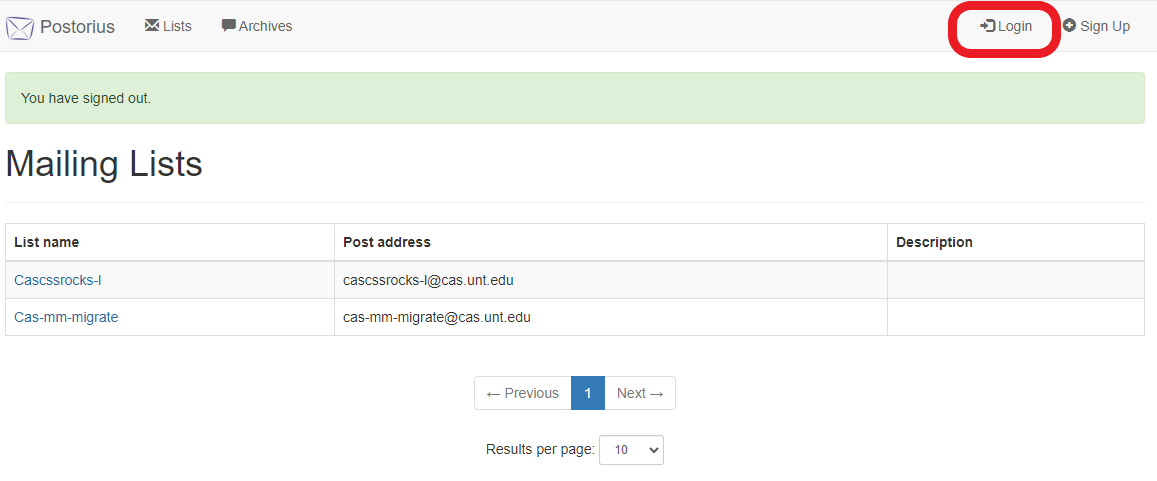
- Visit mail.cas.unt.edu and click the "Manage Mailman Lists" link
- Click the "Login" link in the top right of the page.
- If faculty or staff, log into Mailman with your EUID and UNT password. Students should use their @my.unt.edu email address.
Posting to the List
Posting to the mailing list is done by sending an email to the list's post address. The post address is the name of the mailing list and the domain @cas.unt.edu.
For instance: I am a member of the cascssrocks-l mailing list and I want to post a message to that list to notify the other members that there are donuts in the breakroom. I would compose a new email with the subject and body of my choosing and address the email to cascssrocks-l@cas.unt.edu. If moderation is enabled then a list owner or moderator will be notified that there is a held message pending approval (see the section below called "Moderating Held Messages" for more information on moderation). If moderation for members is not enabled then the message will post and members will receive a copy to their inbox.
Back to topCommon List Settings
You can find common and advanced list settings by clicking the "Settings" tab from your list management page. I highly recommend only changing the settings list below. If you see any other settings you would like to modify, please first contact us at CAS-Postmaster@unt.edu.
List Identity
The first tab under settings, "List Identity" is how the list appears on the main Mailman site. Here, one can decide if the list should be displayed with the other mailing lists, change or set a list description, create a longer longer synopsis about the list's purpose, change the display name, and change the prefix that appears in the subject line.
Automatic Responses
The "Automatic Responses" tab is where one can customize the automatic messages that are sent to owners and posters. This is also where one can turn on/off welcome messages that are sent when members are subscribed. I generally recommend turning off welcome messages if the subscribers added to the list are not opting-in to the list.
Message Acceptance
The "Message Acceptance" is where one can change moderation settings. When in doubt, it is usually best to use "Hold for moderation" for both members and non-members. However, if current subscribers are trusted, subscription requests are moderated, and the list is to be used for open discussion, then it may be appropriate to set member moderation to "Default processing".
Subscription Policy
The last tab in Settings is the "Subscription Policy" tab and this is where one can decide how people can subscribe to the list. I highly recommend leaving the setting on "Moderate" or "Confirm, then moderate" to prevent unwanted subscribers.
Back to topAdding Subscribers (Members)
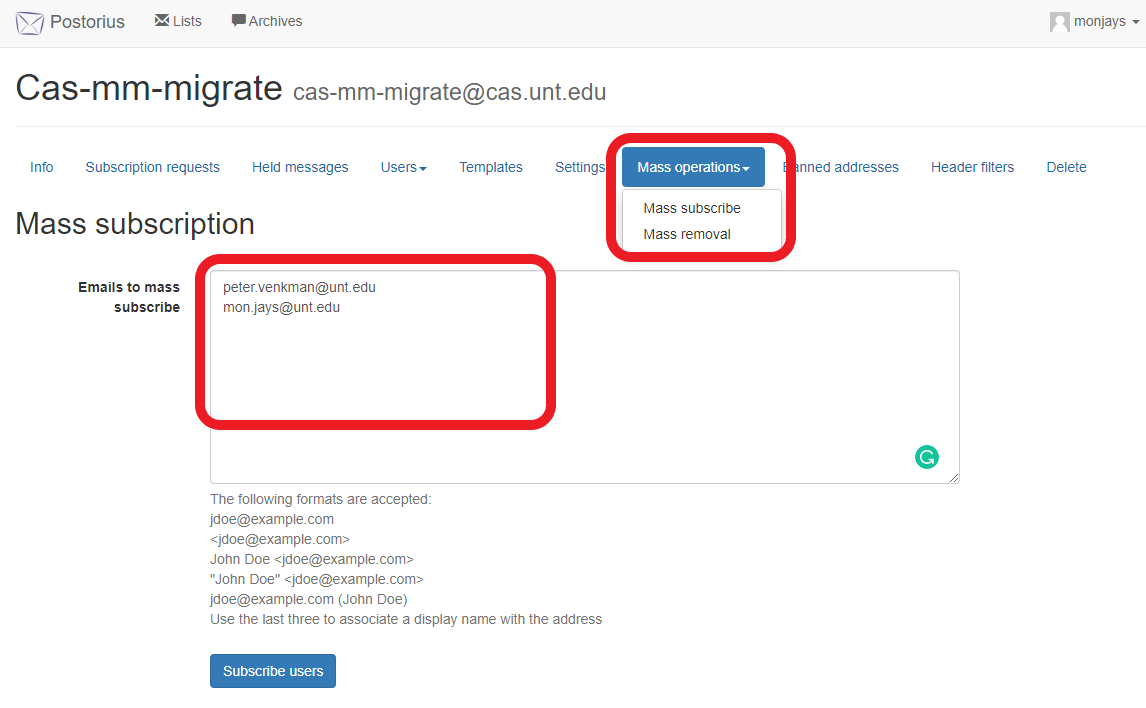
- From your list, click the "Mass operations" tab to display a dropdown menu.
- Click "Mass subscribe".
- In the text box, enter the member information using any of the formats shown below the box, being sure that there is only one member entry per line.
- Click "Subscribe users"
Removing Subscribers (Members)
There are two methods to remove subscribers from a list
Method 1
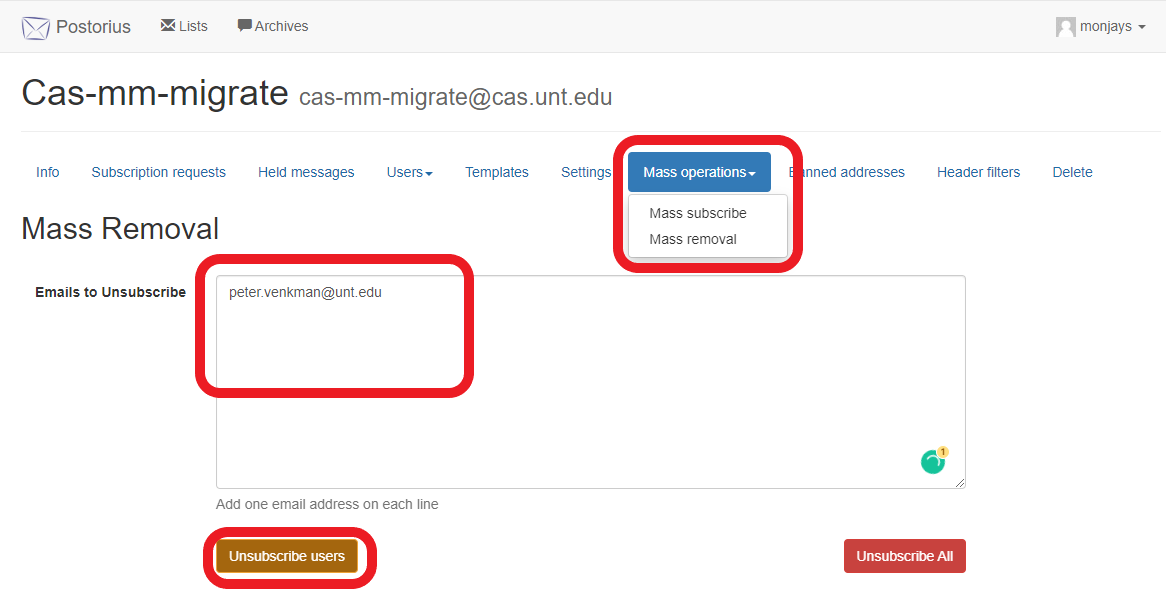
- From your list, click the "Mass operations" tab to display a dropdown menu.
- Click "Mass removal"
- From here you can copy and paste multiple addresses (one per line) into the text area
- Click "Unsubscribe users" to remove only the addresses you entered.
- If you want to remove all subscribers from the list, you can click the "Unsubscribe All" button, then click it again on the confirmation page.
Method 2
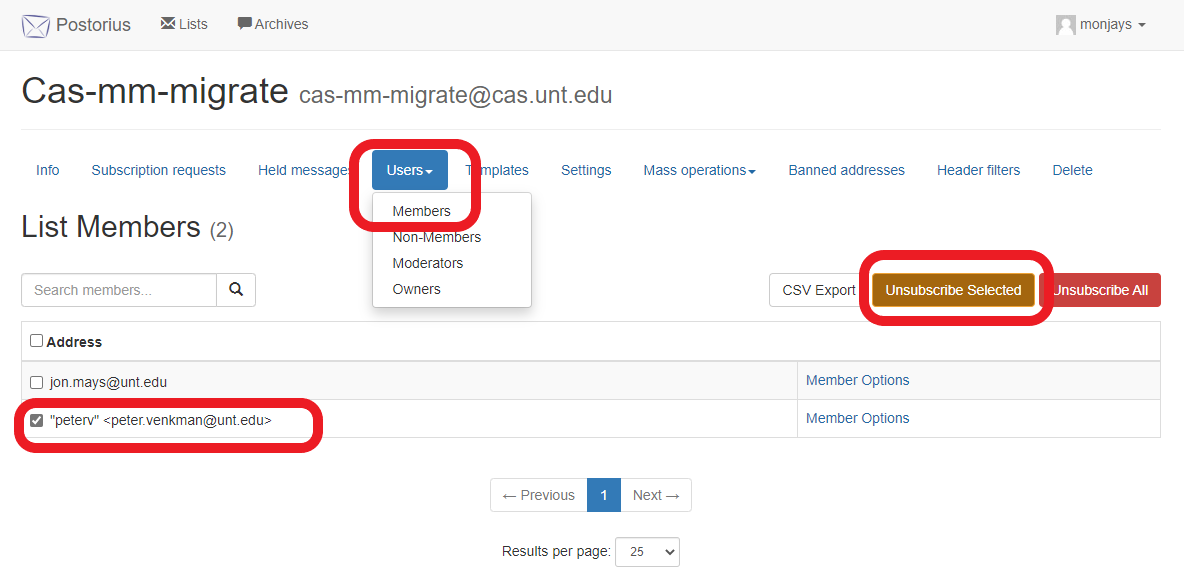
- From your list, click the "Users" tab to display a dropdown menu.
- Click "Members" to view the roster.
- You can check the box next to each address you would like to remove from the list
- You can change the number of results per page by clicking the dropdown at the bottom of the page and selecting a higher number.
- Click "Unsubscribe Selected"
- If you want to remove all subscribers from the list, you can click the "Unsubscribe All" button, then click it again on the confirmation page.
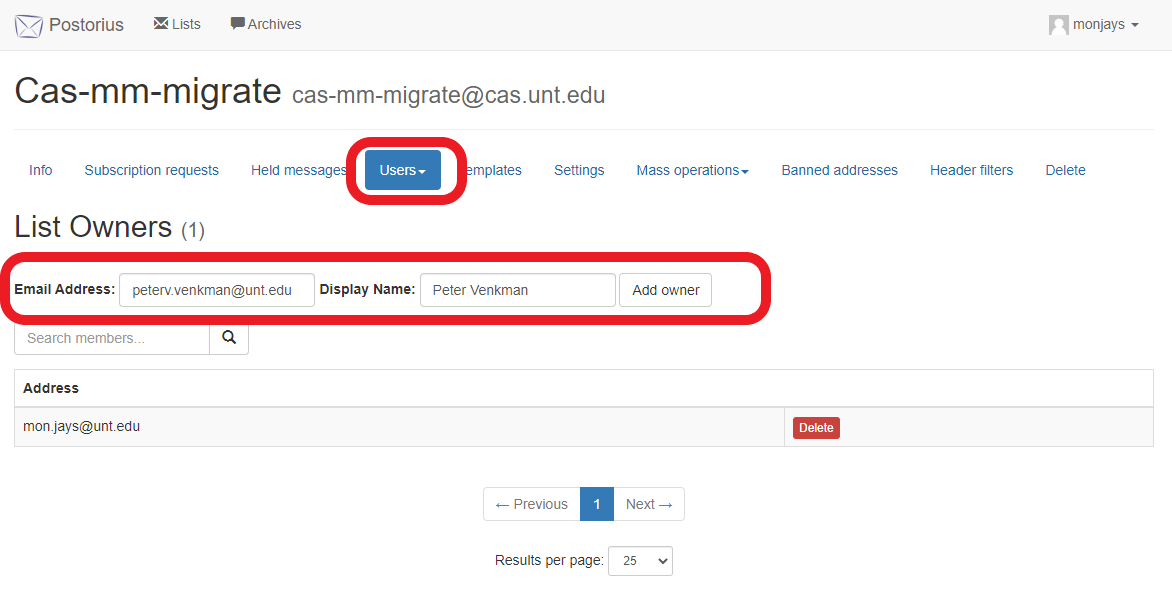
View and Add/Delete List Admins
- From your list, click the "Users" tab to display a dropdown menu
- Click "Owners" to view the current admins
- To add a list admin, input their UNT email address into the "Email Address" field and, optionally, input the name into the "Display Name" field.
- Click "Add owner"
- If the new admin is not already an admin or moderator on another list, then they will be sent a verification email when they try to log into Mailman next. They must verify with that email before they can manage the list.
- To delete an admin, click the "Delete" button next to their address in the Owner roster
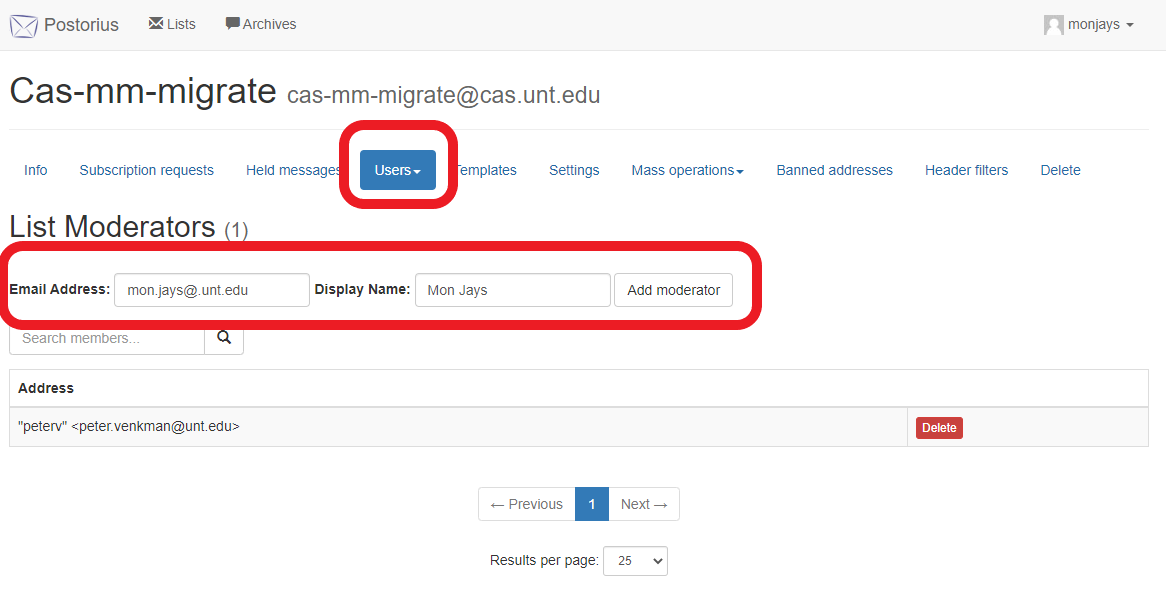
View and Add/Delete List Moderators
- From your list, click the "Users" tab to display a dropdown menu
- Click "Moderators" to view the current moderators
- To add a list moderator, input their UNT email address into the "Email Address" field and, optionally, input the name into the "Display Name" field.
- Click "Add moderator"
- If the new moderator is not already an admin or moderator for another list, then they will be sent a verification email when they try to log into Mailman next. They must verify with that email before they can manage the list.
- To delete a moderator, click the "Delete" button next to their address in the Moderator roster
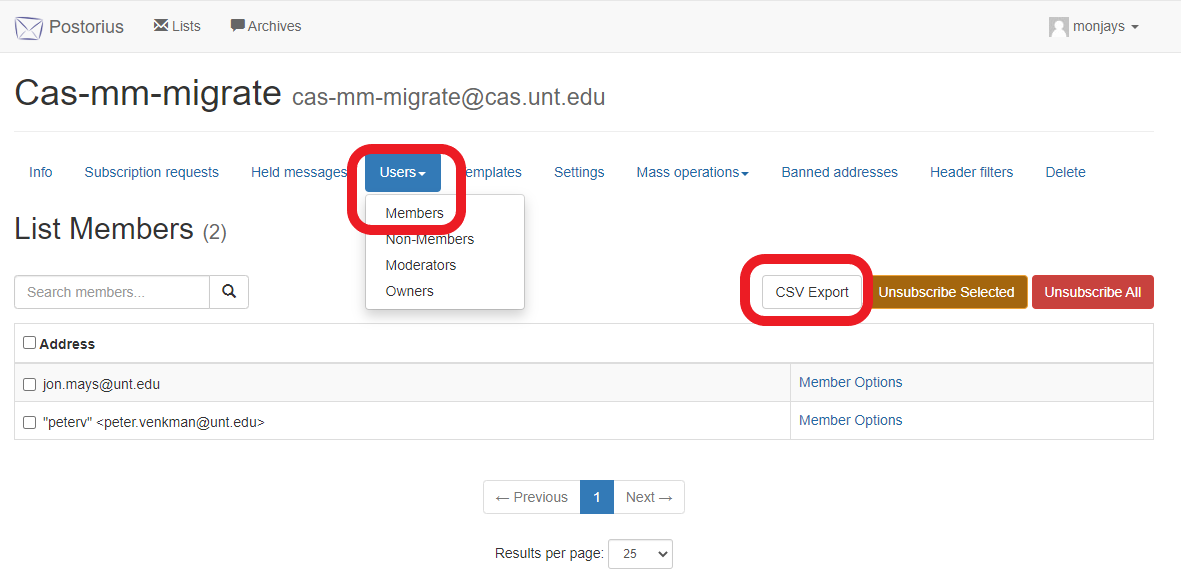
Exporting Member Roster
- From your list, click the "Users" tab to display a dropdown menu
- Click "Members" to view the roster
- Click the "CSV Export" button to download a copy of the roster
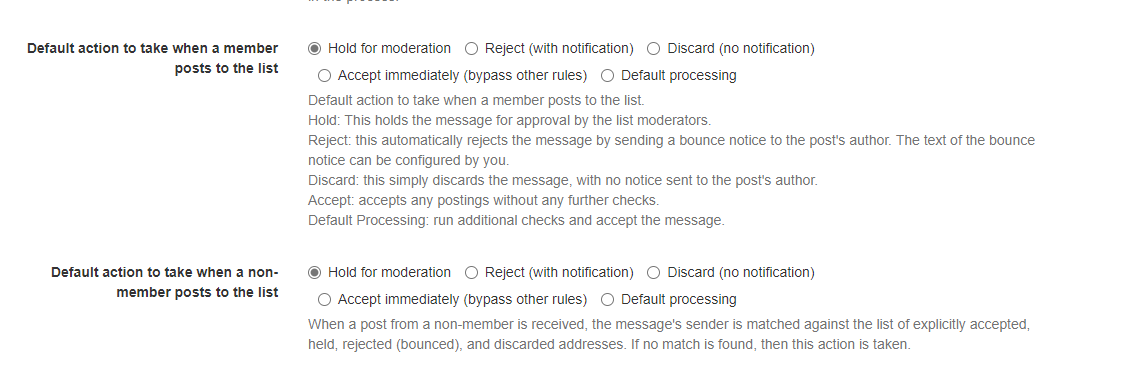
Configure Message Moderation
- From your list, click the "Settings" tab
- Click the "Message Acceptance" tab
- Go to the section called "Default action to take when a member posts to the list"
- Select "Hold for moderation" to require all member posts to be moderated, or "Default processing" to disable moderation
- Go to the section called "Default action to take when a non-member posts to the list"
- A "non-member" is anyone associated with a mailing list that is not in the Members roster. This can be a list admin, moderator, or anyone not subscribed that sends a message to the mailing list.
- Select "Hold for moderation" to require all member posts to be moderated, or "Default processing" to disable moderation (not recommended)
- Click "Save changes" button at the bottom of the page.
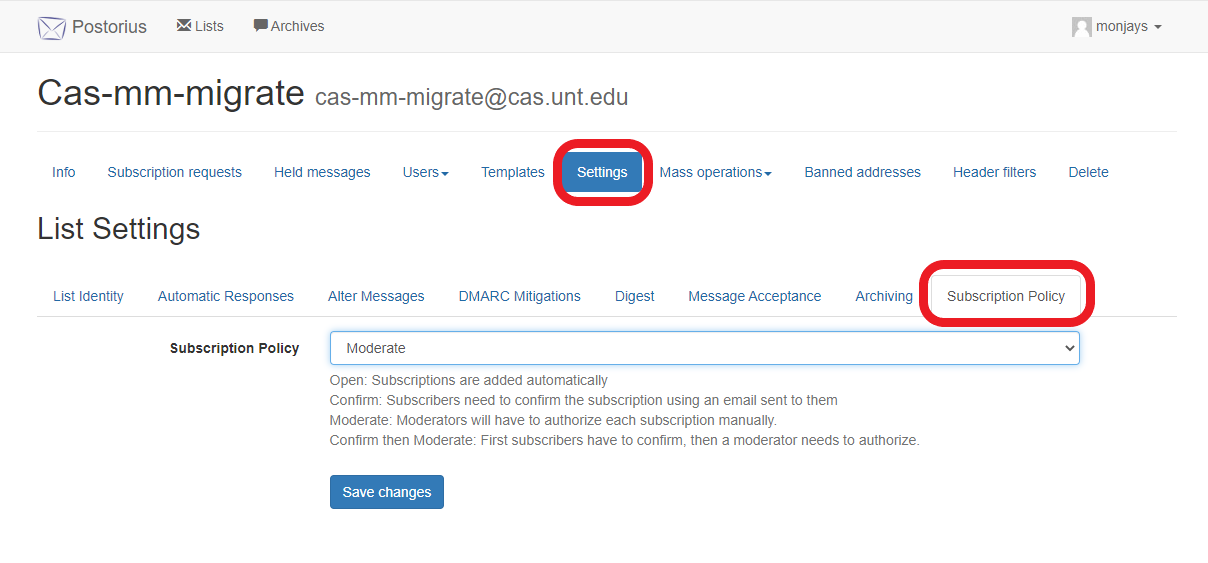
Configure Subscription Moderation
- From your list, click the "Settings" tab
- Click the "Subscription Policy" tab
- Click the dropdown menu next to "Subscription Policy"
- The options are explained below the dropdown menu, but the most common option will be "Moderate" to enable subscription moderation.
- Click "Save changes"
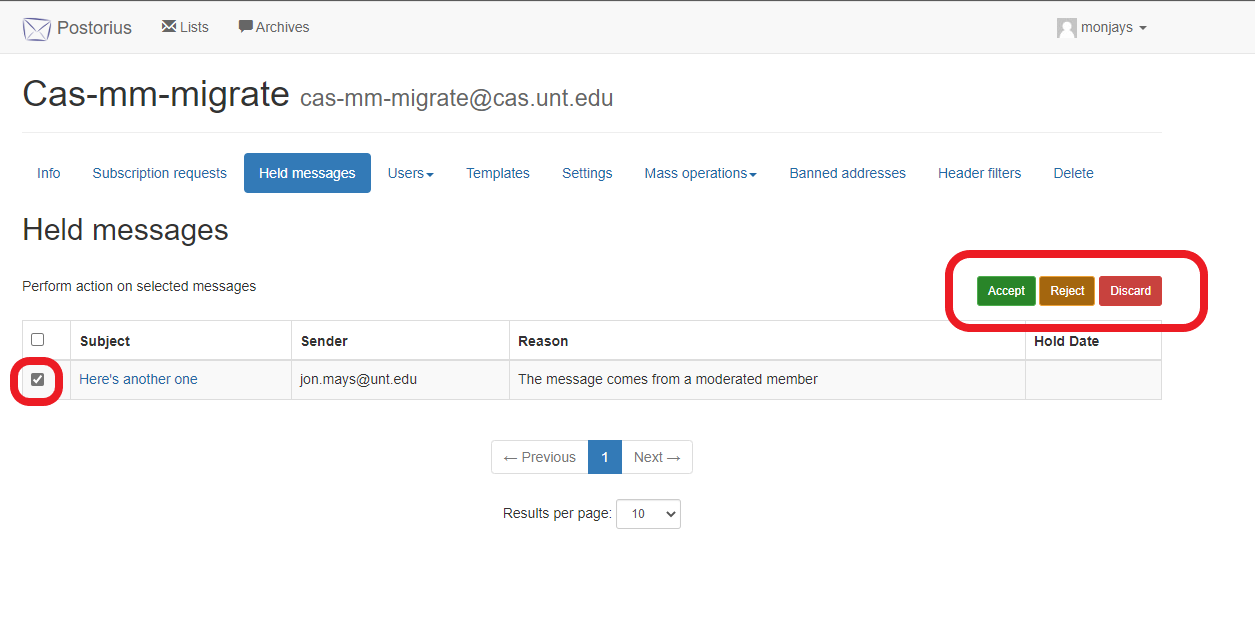
Moderating Held Messages
- From your list, click the "Held Messages" tab
- Messages held for moderation will appear on this screen
- Check the box next to the message(s) you want to operate on then click one of the buttons on the right to Accept, Reject, or Discard.
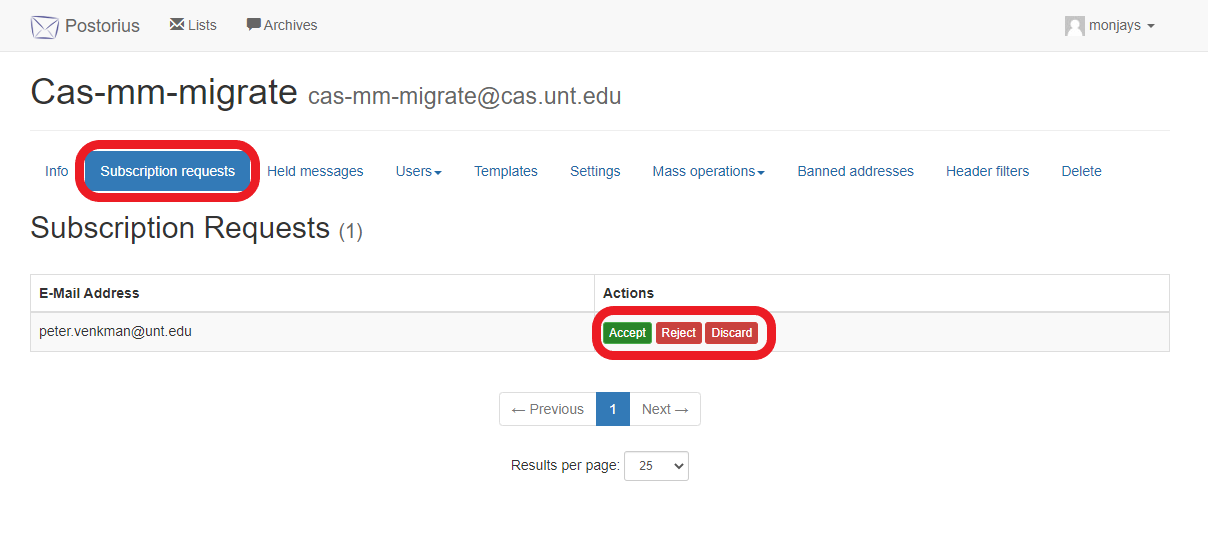
Moderating Subscription Requests
- From your list, click the "Subscription requests" tab
- Click the Accept, Reject, or Discard button next to the email address you would like to operate on.