

If you are updating your mobile device following the July 2014 Microsoft Office 365 migration:
- Remove your existing UNT email account from your device.
- Add a new account using the settings below:
Configure your iPhone or iPad to connect to Office 365
Configure your Android phone/tablet to connect to Office 365
Configure your iPhone or iPad to connect to Office 365
1) On your iPhone tap Settings then 'Mail, Contacts, Calendars."
2) Tap Add Account and select Microsoft Exchange.
3) You will be asked to enter your account information. Enter in the following:
- Email Address: Your Microsoft Login (UPN)
- Password: Your UNT EUID password
4) Exchange will attempt to resolve your information automatically. If it does not, you will be asked to enter additional information, as follows:
- Email Address: Your Microsoft Login (UPN)
- Server: m.outlook.com
- Domain: Leave Blank.
- Username: Your Microsoft Login (UPN)
- Password: Your UNT EUID password
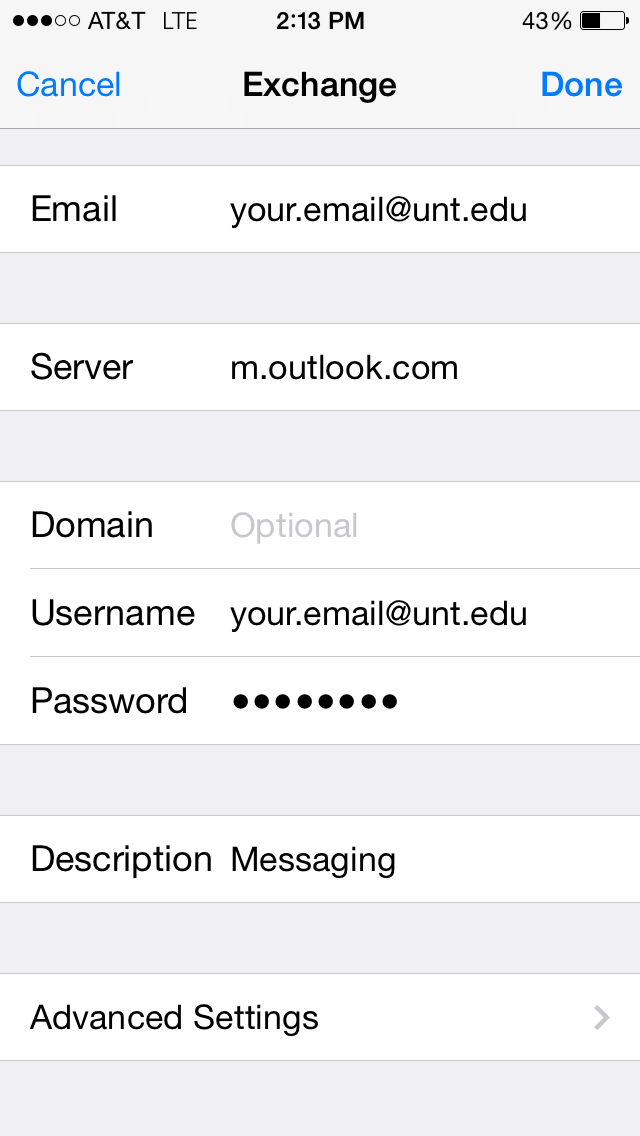
5) Select which parts of your email account you would like to synchronize and tap Sync then Save. Your iPhone should now be configured.
Back to topOffice 365 Configuration for Android Devices
Use the following steps to configure your Android device for use with Office 365.
After migrating to Office 365 you will need to remove your existing Exchange email account from your Android device and add a new account using the instructions below.
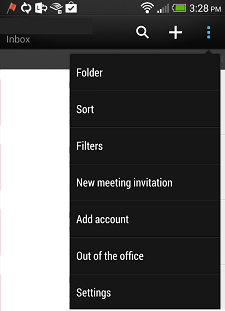
1) Open the native mail client on your Android device. *
2) From the menu, usually 3 vertical dots, and select new account Add Account. If you have not previously configured an email account on your device you will skip this step.
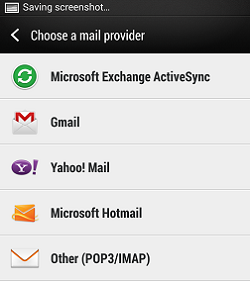
3) Select Microsoft Exchange Active Sync from the list of mail providers.
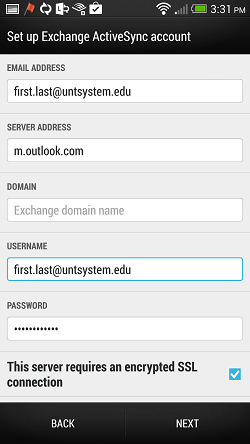
4) Enter in your Your Microsoft Login (UPN) and your UNT EUID password, and choose Next.
5) You may be prompted to enter in additional information. Once entered choose Next.
- Email Address: Your Microsoft Login (UPN)
- Server Address: m.outlook.com
- Domain: leave blank
- Username: Your Microsoft Login (UPN)
- Password: Your password, should not need to be re-entered from previous step.
- This server requires an enctrypted SSL Connection: Checked.
6) Choose which items you wish to sync and an update schedule.*
7) You will be prompted to name the account. Enter a name, choose if you want this to be your default account and choose Finish Setup.
*Due to the variety of Android devices available these instructions may not exactly match the functionality of your device.
Back to top