

Duo Authentication is now needed when logging into the VPN.
1. Visit https://mfa.untsystem.edu/ and log in then click on "Call me" or "Text me" depending on how you have your DUO setup and answer the call/input the text code you recieve from Duo.
2. After, your page will update and you need to click on the blue button that says "Device Options" then click on "Reactivate Duo mobile", make sure at the bottom that "automatically sends this device a push is selected."
3. Now install the Duo app on your phone if it's not already on there, and click on set up a new account then using the QR code on the Duo website scan it with your phone and then follow the steps provided.
4. Now navigate to the VPN and log in after you press "Enter" you will have 7 sec to approve the Duo push sent to your phone. If you already have Duo send you pushes then you can ignore the steps above and just open the Duo app and click approve after logging into the VPN.
If you need to access resources that are only available on the UNT Network, you'll need to use Cisco VPN. To enable VPN, you may need to install a VPN client.
UNT VPN connections will last a maximum of 10 hours before they will need to be reconnected. (This is for security purposes.)
As always, contact us if you have any questions.
Back to topInstalling AnyConnect
CAS ITS Supported Windows Computers
Cisco AnyConnect is available to be installed via SC.
Note: Laptops should automatically have AnyConnect installed.
Other Computers
This includes Personal Apple Computers and Personal Windows Computers.
Connecting to the campus VPN is done in two simple steps:
- Login to the Campus VPN web portal
- Use your EUID to login.
- Use your EUID Password.
- Start AnyConnect
- Download and Install AnyConnect, if needed
Running AnyConnect
First, you are required to set up your Duo Multi Factor Authentication before you are able to use VPN.
Once you set up Duo and have AnyConnect installed on your computer, you can run Cisco AnyConnect from the Start Menu. The VPN address should be pre-populated as vpn.unt.edu (or vpn#.unt.edu -- where # is a number). If you are faculty or staff, leave the group as General and Authenticate with your EUID credentials.
If you need assistance starting AnyConnect, ITSS has provided a document with details. As always, you can contact us for assistance.
Windows
- Click your Start Menu icon (or press the Windows Key)
- Type: Anyconnect
- Click to Run Cisco AnyConnect (or Press Enter if it's highlighted)
- Use vpn.unt.edu as the server address
- Click Connect, then login with EUID and UNT password
- Duo should send you a login verification to your phone. Accept the Duo prompt.
- Read and accept the usage terms.
Linux (Ubuntu, etc.)
- Start Cisco AnyConnect from Applications
- Type in "vpn.unt.edu"
- Click Connect, then login with your UNT credentials
- Duo should send you a login verification to your phone. Accept the Duo prompt.
- Read and accept the usage terms.
Apple macOS
VPN on macOS with Cisco AnyConnect
- Start Cisco AnyConnect from Applications
- Type in "vpn.unt.edu"
- Click Connect, then login with your UNT credentials
- Duo should send you a login verification to your phone. Accept the Duo prompt.
- Read and accept the usage terms.
VPN on macOS with Builtin VPN Client
- Open Network from System Preferences
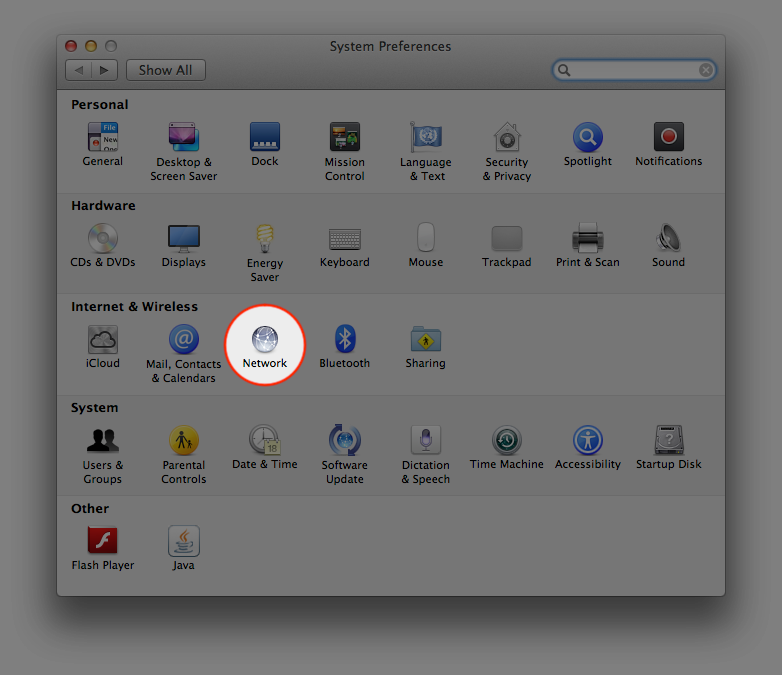
- Click on the plus (+) symbol in the bottom left to add a service.
Note: In order to do this, you must have administrator credentials.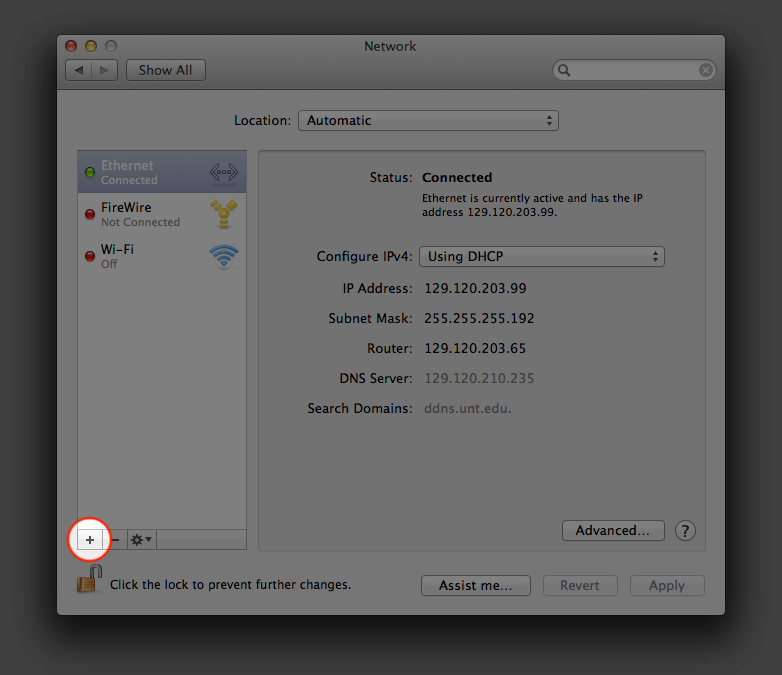
- In the Service Creation window:
Interface: VPN
VPN Type: Cisco IPSec
Service Name: UNT VPN
Click Create
- In the Service Configuration window:
Server Address: vpn.unt.edu
Account Name: EUID
Password: EUID Password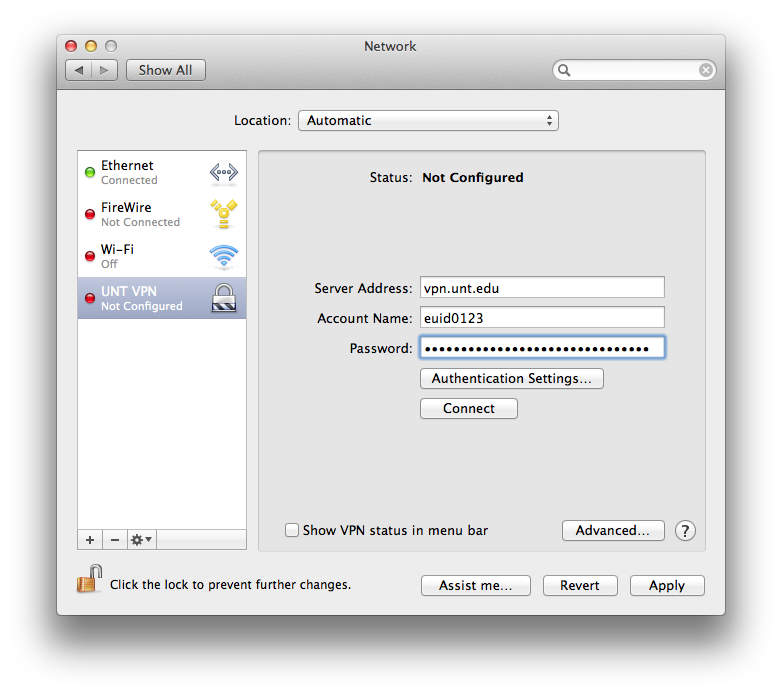
- Click Authentication Settings. In the Authentication Settings windows:
Shared Secret (case sensitive): untvpnaccess
Group Name (case sensitive): General
Click OK
- Click Connect.
Note: You may get prompted for authentication to the VPN connection.- Account Name: EUID
Password: EUID Password
Click OK.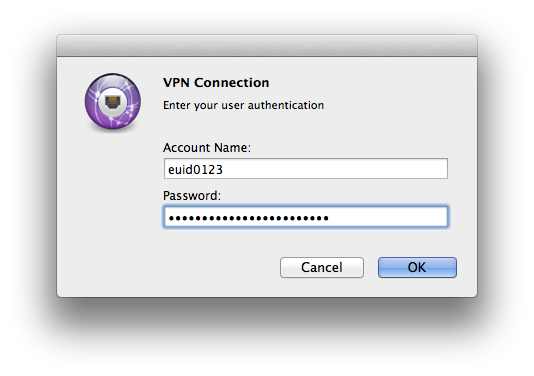
- Read UNT Terms of Service.
Click OK if you understand and agree to the Terms of Service.
Click Disconnect if you don't understand of disagree with the Terms of Service.
Note: you may contact us with any questions or concerns.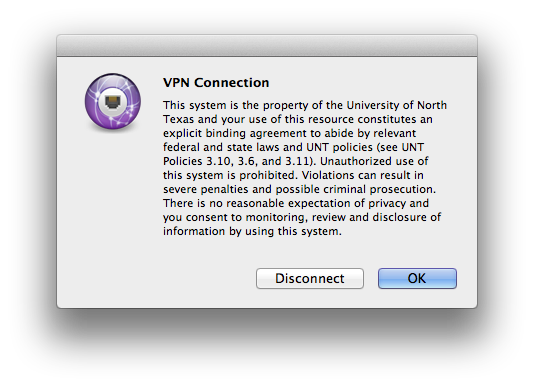
- Account Name: EUID
The Apple computer you're working on is now configured to connect to the UNT VPN.
Back to top